Описание
MAESTRO is a framework for building multi-agent systems based on LLM. The framework is designed to simplify the development of such systems.
Framework Architecture
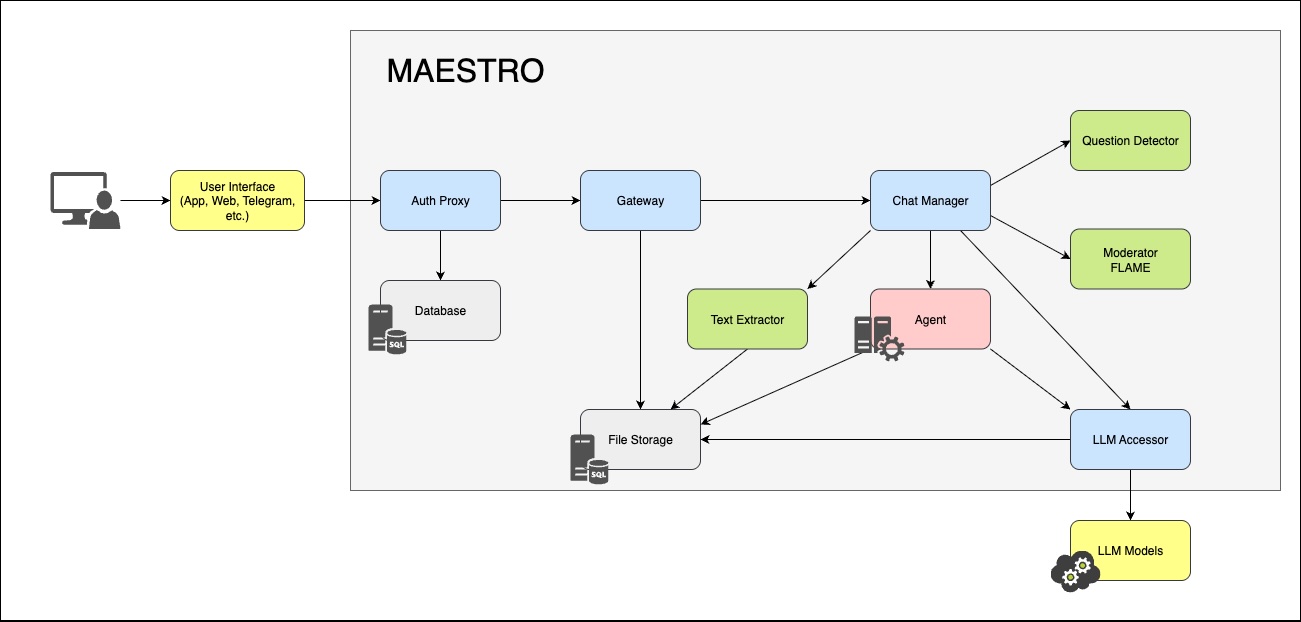
- Authorization and role management
- Dialog state storage
- Interaction with selected LLM (including GigaChat)
- Orchestration of agent and tool calls during dialog
- Moderation and censorship of messages
- Simplified agent integration
- Operation logging
| Library | Usage |
|---|---|
mmar-mapi |
MAESTRO API |
mmar-utils |
Utilities for MAESTRO |
mmar-llm |
Interaction with LLM (including GigaChat) |
mmar-ptag |
Inter-service communication via gRPC |
mmar-flame |
Flexible Moderation |
mmar-carl |
Building Reasoning Chains |
| Category | Technologies |
|---|---|
| Containerization Tools | Docker, Docker Compose |
| Programming Language | Python 3.12+ |
| Data Storage | File System, PostgreSQL 12+ |
| Used Libraries |
|
Reasoning Chains using CARL
CARL (Collaborative Agent Reasoning Library) is a library for formalizing expert thinking based on the Event-Action-Result triad. It allows transforming complex thought processes into a form understandable to LLMs, supporting parallel execution and intelligent context extraction.
Description of the methodology
Reasoning Chains are a structured approach to formalizing expert thinking, based on the triad Event-Action-Result. This methodology transforms complex expert thought processes into a form understandable by LLMs, forming the foundation for intelligent agent systems.
Event denotes the initial event, fact, or action that initiates the reasoning process. Action eflects the responsive activity of the system or expert, including clarifications, analysis, and assignment of procedures. Result shows the final output at each step, whether it is obtained information, an intermediate conclusion, or a strategy adjustment.
MMAR CARL Library
For practical implementation of reasoning chains, a specialized library MMAR CARL (Collaborative Agent Reasoning Library) was developed — a universal tool for building expert thinking systems with support for:
- RAG-like context retrieval — automatic extraction of relevant information from input data for each reasoning step
- Parallel execution based on DAG — automatic optimization of execution sequence considering dependencies between steps
- Multilingualism — built-in support for Russian and English languages
- Universal architecture — applicability to any subject area
Key Components
- StepDescription — formalizes a reasoning step specifying the goal, analysis questions, context retrieval queries, and dependencies on previous steps.
- ReasoningChain — manages the execution order of steps with automatic parallelization of independent operations.
- ReasoningContext — contains initial data, LLM configuration, and execution history.
Full Example: Medical Diagnosis
import asyncio
from mmar_carl import (
    ReasoningChain, StepDescription, ReasoningContext,
    Language, ContextSearchConfig
)
from mmar_llm import EntrypointsAccessor, EntrypointsConfig
import json

# Create EntrypointsAccessor
def create_entrypoints(entrypoints_path: str):
    with open(entrypoints_path, encoding="utf-8") as f:
        config_data = json.load(f)
    entrypoints_config = EntrypointsConfig.model_validate(config_data)
    return EntrypointsAccessor(entrypoints_config)

# Define clinical reasoning chain
CLINICAL_REASONING = [
    StepDescription(
        number=1,
        title="Collect complaints and anamnesis",
        aim="Systematize clinical picture",
        reasoning_questions="What symptoms indicate possible diagnoses?",
        step_context_queries=[
            "main complaints",
            "duration of symptoms",
            "risk factors"
        ],
        stage_action="Form preliminary hypotheses",
        example_reasoning="Nature and dynamics of symptoms determine diagnostic search direction"
    ),
    StepDescription(
        number=2,
        title="Analyze objective data",
        aim="Evaluate examination results",
        reasoning_questions="Which objective signs confirm hypotheses?",
        dependencies=[1],  # Depends on step 1
        step_context_queries=[
            "examination results",
            "laboratory indicators",
            "instrumental data"
        ],
        stage_action="Correlate subjective and objective data",
        example_reasoning="Laboratory indicators correlate with clinical picture"
    ),
    StepDescription(
        number=3,
        title="Form diagnostic conclusion",
        aim="Establish final diagnosis",
        reasoning_questions="What is the most probable diagnosis?",
        dependencies=[1, 2],  # Depends on steps 1 and 2
        step_context_queries=[
            "clinical guidelines",
            "differential diagnosis",
            "diagnostic criteria"
        ],
        stage_action="Synthesize diagnostic conclusion",
        example_reasoning="Diagnosis is based on combination of clinical and laboratory data"
    )
]

# Context search configuration
search_config = ContextSearchConfig(
    strategy="vector",  # Semantic search
    vector_config={
        "similarity_threshold": 0.75,
        "max_results": 5
    }
)

# Create reasoning chain
chain = ReasoningChain(
    steps=CLINICAL_REASONING,
    search_config=search_config,
    max_workers=2,
    enable_progress=True
)

# Patient medical data
patient_data = """
Patient: male, 45 years old
Main complaints: pressing chest pain,
shortness of breath upon physical exertion
Duration of symptoms: 2 weeks
Risk factors: smoking 20 years, arterial hypertension
Examination results: BP 160/95, HR 88, no wheezing in lungs
Laboratory indicators: LDL cholesterol 4.9 mmol/L, troponin negative
Instrumental data: ECG - signs of left ventricular hypertrophy
"""

# Initialize context
entrypoints = create_entrypoints("entrypoints.json")
context = ReasoningContext(
    outer_context=patient_data,
    entrypoints=entrypoints,
    entrypoint_key="gigachat-2-max",
    language=Language.RUSSIAN,
    retry_max=3
)

# Execute reasoning chain
result = chain.execute(context)

# Get results
print("=== Diagnostic Conclusion ===")
print(result.get_final_output())

print("\n=== Step Results ===")
for step_num, step_result in result.step_results.items():
    print(f"\nStep {step_num}: {step_result}")
Context Search Configuration
CARL supports two modes for extracting relevant information:
Substring Search
ode class="="language-python">from mmar_carl import ContextSearchConfig, ReasoningChain


search_config = ContextSearchConfig(
    strategy="substring",
    substring_config={
        "case_sensitive": False,      # Case-insensitive search
        "min_word_length": 3,         # Minimum word length
        "max_matches_per_query": 5    # Maximum results per query
    }
)

chain = ReasoningChain(
    steps=steps,
    search_config=search_config
)
Vector Search
search_config = ContextSearchConfig(
    strategy="vector",
    vector_config={
        "similarity_threshold": 0.7,
        "max_results": 5
    }
)
Advantages of Using CARL
- 🎯 Formalization of expert thinking — structured representation of complex reasoning
- ⚡ Automatic optimization — parallel execution of independent steps
- 🔍 Intelligent context retrieval — RAG-like retrieval of relevant information
- 🌍 Multilingualism — built-in support for Russian and English
- 🏗️ Universality — applicable to any subject area (medicine, law, finance)
- ⚙️ Product readiness — error handling, retries, monitoring
Example Usage
import asyncio
from mmar_carl import (
    ReasoningChain, StepDescription, ReasoningContext,
    Language, ContextSearchConfig
)
from mmar_llm import EntrypointsAccessor, EntrypointsConfig
import json

# Define clinical reasoning chain
CLINICAL_REASONING = [
    StepDescription(
        number=1,
        title="Collect complaints and anamnesis",
        aim="Systematize clinical picture",
        reasoning_questions="What symptoms indicate possible diagnoses?",
        step_context_queries=[
            "main complaints",
            "duration of symptoms",
            "risk factors"
        ],
        stage_action="Form preliminary hypotheses",
        example_reasoning="Nature and dynamics of symptoms determine diagnostic search direction"
    )
]

# Create reasoning chain
chain = ReasoningChain(
    steps=CLINICAL_REASONING,
    search_config=search_config,
    max_workers=2,
    enable_progress=True
)

# Execute reasoning chain
result = chain.execute(context)
Working with Chain Execution Results
After executing the reasoning chain, the execute() method returns a ReasoningResult object that contains complete information about the execution of all steps.
class ReasoningResult:
    success: bool                           # Overall execution success
    history: list[str]                      # Full reasoning history
    step_results: list[StepExecutionResult] # Results of each step
    total_execution_time: float | None      # Total execution time
    metadata: dict[str, Any]                # Additional metadata
Each step returns detailed information about its execution:
class StepExecutionResult:
    step_number: int             # Step number
    step_title: str              # Step title
    result: str                  # Result from LLM
    success: bool                # Step execution success
    error_message: str | None    # Error message
    execution_time: float | None # Execution time in seconds
    updated_history: list[str]   # History after this step
Getting the Final Result
get_final_output() -- returns only the text of the last step without any service headers:
result = chain.execute(context)
# Get only the final step output
final_answer = result.get_final_output()
print(final_answer)
Example output:
Based on the clinical picture and examination results, the patient is diagnosed with stage II arterial hypertension with a high risk of cardiovascular complications...
Getting the Full History
get_full_output() -- returns the full execution history with all steps:
# Get the entire reasoning history
full_history = result.get_full_output()
print(full_history)
Example output:
Step 1. Collection of Complaints and Medical History
Result: The patient reports complaints of chest pain...

Step 2. Analysis of Objective Data
Result: Objective examination of tests revealed the following abnormalities...

Step 3. Formation of Diagnostic Conclusion
Result: Based on the clinical picture...
Working with Results of Individual Steps
step_results -- a list of StepExecutionResult objects for each step:
# Iterating over the results of each step
for step in result.step_results:
    print(f"Step {step.step_number}: {step.step_title}")
    print(f"Status: {'✓' if step.success else '✗'}")
    print(f"Execution time: {step.execution_time:.2f}s")
    print(f"Result: {step.result}\n")
Filtering Successful and Failed Steps
get_successful_steps() -- returns only successfully completed steps:
successful = result.get_successful_steps()
print(f"Successfully completed: {len(successful)} steps")
get_failed_steps() -- returns steps with errors:
failed = result.get_failed_steps()
if failed:
    print("Execution errors:")
    for step in failed:
        print(f"  Step {step.step_number}: {step.error_message}")
Comparison of Output Retrieval Methods
| Method | Purpose | Output Format |
|---|---|---|
get_final_output() |
Only the final answer | Plain text without headers |
get_full_output() |
Complete history | Text with all steps and headers |
step_results |
Access to individual steps | List of StepExecutionResult objects |
history |
Direct access to history | List of strings |
get_successful_steps() |
Only successful steps | List of successful StepExecutionResult |
get_failed_steps() |
Only steps with errors | List of failed StepExecutionResult |
Usage Recommendations
- For production applications, use
get_final_output()to display the final result to the user and for use in multi-agent system nodes - For debugging, apply
get_full_output()and detailed analysis ofstep_results - For monitoring, track
success,execution_time, andmetadata - For logging, save the complete
historyand error information - For analytics, use metadata from
result.metadatato analyze performance
Example 1: Basic Result Handling
result = chain.execute(context)

# Check success
if result.success:
    print("✓ Chain executed successfully")
    print(f"Total time: {result.total_execution_time:.2f}s")
    print(f"\nFinal output:\n{result.get_final_output()}")
else:
    print("✗ Execution finished with errors")
    for failed_step in result.get_failed_steps():
        print(f"  Step {failed_step.step_number}: {failed_step.error_message}")
Example 2: Detailed Execution Analysis
result = chain.execute(context)

print("=== EXECUTION STATISTICS ===")
print(f"Total steps: {len(result.step_results)}")
print(f"Successful: {len(result.get_successful_steps())}")
print(f"Failed: {len(result.get_failed_steps())}")
print(f"Total time: {result.total_execution_time:.2f}s")

# Detailed information for each step
print("\n=== STEP RESULTS ===")
for step in result.step_results:
    status = "✓ SUCCESS" if step.success else "✗ ERROR"
    print(f"\n[{status}] Step {step.step_number}: {step.step_title}")
    print(f"Time: {step.execution_time:.2f}s")

    if step.success:
        # Show the first 200 characters of the result
        preview = step.result[:200] + "..." if len(step.result) > 200 else step.result
        print(f"Result: {preview}")
    else:
        print(f"Error: {step.error_message}")
Example 3: Working with Metadata
result = chain.execute(context)

# Retrieving execution statistics
if "execution_stats" in result.metadata:
    stats = result.metadata["execution_stats"]
    print("=== PARALLELIZATION STATISTICS ===")
    print(f"Parallel batches: {stats['parallel_batches']}")
    print(f"Total steps: {stats['total_steps']}")
    print(f"Executed: {stats['executed_steps']}")
    print(f"Errors: {stats['failed_steps']}")
Example 4: Accessing Execution History
The history attribute contains a list of strings with the results of each step in execution order:
result = chain.execute(context)

# Get history as a list
for i, entry in enumerate(result.history, 1):
    print(f"\n--- Entry {i} ---")
    print(entry)

# Or as a single string
full_text = result.get_full_output()
Example 5: Error Handling
In case of errors during execution:
result = chain.execute(context)

if not result.success:
    print("⚠ Errors detected in chain execution")

    # Retrieve all failed steps
    failed_steps = result.get_failed_steps()

    for step in failed_steps:
        print(f"\nError at step {step.step_number}: {step.step_title}")
        print(f"Message: {step.error_message}")

        # Show the last successful entry in history
        if step.updated_history:
            print(f"Last history entry: {step.updated_history[-1][:100]}...")

    # Get partial results of successful steps
    successful_steps = result.get_successful_steps()
    print(f"\nSuccessfully completed {len(successful_steps)} out of {len(result.step_results)} steps")
Example 6: Integration with Logging System
import logging

logger = logging.getLogger(__name__)

result = chain.execute(context)

# Logging results
logger.info(f"Chain execution completed: success={result.success}")
logger.info(f"Total execution time: {result.total_execution_time:.2f}s")

for step in result.step_results:
    if step.success:
        logger.debug(f"Step {step.step_number} succeeded in {step.execution_time:.2f}s")
    else:
        logger.error(f"Step {step.step_number} failed: {step.error_message}")

# Saving final result
logger.info(f"Final output: {result.get_final_output()}")
Authorization Service
AuthService is an authentication and authorization module supporting two client types: users (via email/password) and client applications (via client_id/client_secret). It uses JWT tokens with expiration and brute force protection via reCAPTCHA.
Описание
AuthService this fully-featured authentication module provides a flexible authorization system. It supports two main scenarios: end user authorization via email and password, and client application authorization via client_id/client_secret pair.
To protect against automated attacks and brute force, the system integrates Google reCAPTCHA, which can be enabled or disabled in the configuration. All passwords are hashed using a modern algorithm before storing in the database.
The service uses JWT (JSON Web Tokens) for user session management. Tokens include payload with client, user, and authorization type info, along with expiration time. Tokens are saved in the database for forced logout capability.
Main API Methods
class AuthService:
    async def register(self, data: V1RegisterRequest, external_id: str | None = None) -> list
    async def login(self, form: LoginForm) -> V1JWTResponse
    async def login_client(self, form: ClientLoginForm) -> V1JWTResponse
    async def identify(self, auth_header: str) -> dict
    async def get_info_about_me(self, auth_header: str) -> V1Me
    async def refresh(self, auth_header: str) -> V1JWTResponse
    async def logout(self, auth_header: str) -> V1JWTResponse
Authorization Type
The service supports two authorization mechanisms:
- Bearer Token User authorization via JWT tokens
- Basic Auth Client application authorization via client_id/client_secret
User Authorization:
# Header for user authorization
Authorization: Bearer eyJ0eXAiOiJKV1QiLCJhbGciOiJIUzI1NiJ9...
Client Authorization:
# Header for client authorization
Authorization: Basic Y2xpZW50X2lkOmNsaWVudF9zZWNyZXQ=
Security Measures
- Password Hashing — all passwords are hashed before saving
- reCAPTCHA — protection against automated registration and brute force
- JWT with expiration — tokens have limited lifetime
- Email validation — emails normalized to lowercase
- User activity check — only active users can authorize
- Client Secret Hole — additional mechanism for generating client_secret based on client_id
Data Models
class V1RegisterRequest:
    email: str
    password: str
    full_name: str
    where_from: str
    why_access: str
    captcha: str
    client_id: str

class LoginForm:
    email: str
    password: str

class ClientLoginForm:
    client_id: str
    client_secret: str

class V1JWTResponse:
    access_token: str
    token_type: str = "bearer"
Error Handling
The service throws standardized exceptions:
FailedToRegisterException— registration error (captcha not passed, incorrect data)InvalidCredentialsException— invalid credentialsTokenExpiredException— token expirationInvalidTokenException— invalid token format
All exceptions are automatically converted into the corresponding HTTP statuses (400, 401) when used with FastAPI.
Usage Example
from src.auth_service import AuthService
from src.models import LoginForm, ClientLoginForm, V1RegisterRequest

# Service initialization
auth_service = AuthService(auth_config, db)

# User registration
register_data = V1RegisterRequest(
    email="user@example.com",
    password="secure_password",
    full_name="Ivan Ivanov",
    where_from="web",
    why_access="work",
    captcha="recaptcha_token",
    client_id="client_app"
)
await auth_service.register(register_data)

# User login
login_form = LoginForm(email="user@example.com", password="secure_password")
jwt_response = await auth_service.login(login_form)

# Client application login
client_form = ClientLoginForm(client_id="client_app", client_secret="secret_key")
client_token = await auth_service.login_client(client_form)
Access to LLM
LLM Accessor provides a standardized interface for working with texts, vectors, files, and images.
LLM Accessor is a universal gateway for interaction with modern language and multimodal models (LLM and VLM). The service provides a simple and standardized interface for accessing various artificial intelligence models, allowing developers to easily integrate the power of neural networks into their applications. Thanks to its flexible architecture, you can choose suitable model instances, manage requests, and receive precise answers to text and multimodal tasks—all through a single API. It is the ideal solution for those who value time and want to focus on application logic rather than the intricacies of integration with different AI services.
The service is built on the mmar-llm library.
Service API (available via GRPC protocol)
class LLMAccessorAPI:
def get_entrypoint_keys(self) -> list[str]:
    raise NotImplementedError

def get_response(
    self,
    *,
    prompt: str,
    resource_id: ResourceId | None = None,
    entrypoint_key: str | None = None,
    max_retries: int = 1,
) -> str:
    raise NotImplementedError

def get_response_by_payload(
    self,
    *,
    payload: dict[str, Any],
    resource_id: ResourceId | None = None,
    entrypoint_key: str | None = None,
    max_retries: int = 1,
) -> str:
    raise NotImplementedError

def get_embedding(
    self,
    *,
    prompt: str,
    resource_id: ResourceId | None = None,
    entrypoint_key: str | None = None,
    max_retries: int = 1,
) -> list[float]:
    raise NotImplementedError
Usage Exampl
from mmar_mapi.api import LLMAccessorAPI
from mmar_ptag import ptag_client

llm = ptag_client(LLMAccessorAPI,  config.addresses.llm)

prompt: str = "Hello! Let's chat!"
response: str = llm.get_response(prompt=prompt)
To make a call, you need to know the list of available model instances. You can get it from the service:
entrypoint_keys: list[str] = llm.get_entrypoint_keys()The list of available models can be changed in the service configuration at startup. The service supports working with families like GigaChat, YandexGPT, and OpenAI, as well as models available in OpenRouter or deployed locally.
Fast Text Extraction Service
Text Extractor is a universal solution for automatic text extraction from documents and images. Supports PDF, JPG, PNG, and other formats.
The Text Extractor service easily integrates into your system and allows you to quickly convert visual information into a comprehensible text format for LLMs. It is based on Tesseract and PyPDF. The service guarantees sufficient accuracy (CER less than 4%) and processing speed even when working with large data volumes.
Text Extractor is ideal for prototyping applications in the field of intelligent document processing.
Service API (available via GRPC protocol)
class TextExtractorAPI:
def extract(self, *, resource_id: ResourceId) -> ResourceId:
    """returns file with text"""
    raise NotImplementedError
Usage example:
To make calls, you need to be able to receive and deliver files in the system. This is implemented in MAESTRO using the FileStorage abstraction.
from mmar_mapi import FileStorage
from mmar_mapi.api import ResourceId, TextExtractorAPI
from mmar_ptag import ptag_client

text_extractor = ptag_client(TextExtractorAPI, config.addresses.moderator)
file_storage = FileStorage()

resource_id: ResourceId = "data/file.pdf"

out_res_id: ResourceId = text_extractor.extract(resource_id=resource_id)
interpretation: str = file_storage.download_text(out_res_id)
Moderator
FLAME is a moderation system that analyzes LLM outputs to protect against jailbreak attacks. It uses n-grams and rules to classify text with high accuracy (98.7%) and minimal latency (2-5 ms).
Description
FLAME: Flexible LLM-Assisted Moderation Engine is a modern solution for effective and flexible content moderation in large language models (LLM). Unlike traditional systems that focus on filtering input queries, FLAME analyzes the model’s output, allowing more reliable protection from jailbreak attacks, including Best-of-N methods. The system is easily customizable for specific needs, enabling the definition of prohibited topics and quick updating of moderation rules without complex retraining. This makes FLAME an ideal tool for integration into products where security and content compliance are critical.
FLAME works by using n-grams and rules for text classification. The system converts messages into normalized n-grams and compares them to a pre-prepared LLM-assisted list of banned phrases. Thanks to its lightweight architecture, FLAME requires minimal computational resources—up to 0.1 CPU core and 100 MB RAM when running in a single thread. This allows processing messages in just 2-5 ms, ensuring high performance even under heavy load.
Service quality is proven by tests and real implementations in SberHealth, SberMedAI, and SberCRT. FLAME demonstrates impressive metrics: precision reaches 98.7% and recall 90.9%. In trials, the system reduced successful jailbreak attacks by 2-9 times compared to built-in moderation mechanisms of models like GPT-4o-mini, DeepSeek-v3, and others. Low false positive rates and resilience to modern threats make FLAME a reliable solution for user safety and comfort in chat systems and other LLM applications.
Service API (available via GRPC protocol)
class BinaryClassifiersAPI:
def get_classifiers(self) -> list[str]:
    raise NotImplementedError

def evaluate(self, *, classifier: str | None = None, text: str) -> bool:
    raise NotImplementedError
Usage Details
To make a call, you need to select a classifier. The list of classifiers can be obtained from the service:
classifiers: list[str] = moderator.get_classifiers()Currently available classifiers:
black— blacklist (politics, religion, controversial personalities)greet— greetingsreceipt— prescription medicationschild— children
Extending classifiers and creating new ones
To expand the list of banned phrases in FLAME, a special generation pipeline is used: an unmoderated LLM generates numerous variations of messages on forbidden topics, which are then split into n-grams (up to 3 words), normalized, and filtered. Only those n-grams that occur frequently enough and do not cause false positives on a collection of safe dialogues make it into the final blacklist. The same pipeline can be used to create classifiers for other topics.
Usage Example
from mmar_mapi.api import BinaryClassifiersAPI
from mmar_ptag import ptag_client

moderator = ptag_client(BinaryClassifiersAPI, config.addresses.moderator)
text_to_check: str = "Hi!"
is_suspicious: bool = moderator.evaluate(classifier="black", text=text_to_check)
Question Detector
Question Detector is a binary classification service for accurately determining whether a text message is a question. It uses a combination of vector embeddings, punctuation analysis, and language models to achieve accuracy over 99.9%.
This powerful binary classification service allows you to instantly and accurately determine whether a text message is a question. Using a combination of modern technologies—including GigaChat vector embeddings, punctuation analysis, keywords, and advanced language models—the service provides the highest recognition accuracy even in complex and ambiguous cases. It is the ideal solution for automating incoming request processing, chatbots, and intelligent analytical systems.
Implementing our question detector significantly improves your business process efficiency. The service integrates easily via a convenient API, works in real time, and adapts to various subject areas. Save time and resources by ensuring instant response to user questions and improving service quality with advanced text classification technology.
The algorithm works on an ensemble principle, combining four key features: semantic vector representation of text from GigaChat, the syntactic feature of a question mark at the end, the linguistic feature of the first word being in a predefined list of interrogative words, and finally, the result of analysis by a large language model based on a special prompt that assesses whether the phrase is a question based on context and meaning; all these features are combined into a single vector on which a binary classifier is trained, allowing reliable distinction between interrogative and non-interrogative sentences even in complex cases where formal features contradict semantics. The precision and recall of the service exceed 99.9%.
Service API (available via GRPC protocol
class BinaryClassifiersAPI:
def get_classifiers(self) -> list[str]:
    raise NotImplementedError

def evaluate(self, *, text: str) -> bool:
    raise NotImplementedError
Usage Example
from mmar_mapi.api import BinaryClassifiersAPI
from mmar_ptag import ptag_client

question_detector = ptag_client(BinaryClassifiersAPI, config.addresses.question_detector)
text_to_check: str = "Is this a question?"
is_question: bool = question_detector.evaluate(text=text_to_check)
Team

Eugene Tagin
Research Engineer
AIRI

Ilia Kopanichuk
Senior Research Scientist
AIRI, MFTI

Ivan Bakulin
Research Scientist
AIRI

Vladimir Shaposhnikov
Junior Research Scientist
AIRI, Skoltech

Nikita Glazkov
Junior Research Scientist
AIRI, MISIS

Igor Trambovetsky
Systems Analyst
AIRI

Yaroslav Bespalov
Group Leader
AIRI